

A 4-variable Boolean function has 16 possible input combinations, so its K-Map contains 16 cells arranged as a 4×4 grid.
The method is the same as with smaller maps, but the extra cells create more adjacency, overlap, and wrap-around possibilities. That makes accurate placement especially important.
What Does a 4-Variable K-Map Look Like?
A 4-variable K-Map normally uses four variables:
A, B, C, D
A common arrangement uses:
- AB for the rows
- CD for the columns
Both axes follow Gray-code order:
00, 01, 11, 10
That creates a 4×4 grid containing all 16 possible input combinations.
Gray code matters because adjacent labels differ by only one bit.
4-Variable K-Map Cell Numbering
Minterm numbers come from the binary ABCD input value, but their visual locations are rearranged by the Gray-code axes.
| AB \ CD | 00 | 01 | 11 | 10 |
|---|---|---|---|---|
| 00 | m0 | m1 | m3 | m2 |
| 01 | m4 | m5 | m7 | m6 |
| 11 | m12 | m13 | m15 | m14 |
| 10 | m8 | m9 | m11 | m10 |
A common mistake is writing:
m0, m1, m2, m3
straight across the first row.
That is wrong for a standard K-Map because the column order is:
00, 01, 11, 10
not ordinary binary:
00, 01, 10, 11
How to Fill a 4-Variable K-Map
Filling the map is a direct translation process.
- Start from the truth table or minterm/maxterm list.
- Find the corresponding cell for each combination.
- Put 1, 0, or X into the correct cell.
- Preserve the original required output.
- Begin grouping only after the map is filled correctly.
If you are starting from a truth table, see how to convert a truth table to a Karnaugh Map.
Valid Group Sizes
For a 4-variable K-Map, valid group sizes are:
1, 2, 4, 8, 16
- A group of 2 is a pair.
- A group of 4 is a quad.
- A group of 8 is an octet.
A full 16-cell group can occur when the entire map is eligible for the chosen grouping. For SOP, an all-1/usable-X map can simplify to 1; for POS, an all-0/usable-X map can simplify to 0.
Groups must remain valid power-of-two rectangular regions under K-Map adjacency.
- Overlap is allowed.
- Wrap-around is allowed.
- Diagonal-only adjacency is not.
For the full geometric rules, see the Karnaugh Map grouping rules guide.
Worked Example 1: Simplifying a 4-Variable K-Map
Consider:
F(A,B,C,D) = Σm(0,2,5,7,8,10,13,15)
The required 1 cells are:
m0, m2, m5, m7, m8, m10, m13, m15
Two clean quads cover the function.
Group 1: The Four Corners
The first group contains:
m0, m2, m8, m10
These are the four corner cells.
Across all four:
- B = 0
- D = 0
A changes.
C changes.
The changing variables disappear, leaving:
B'D'
This quad works through horizontal and vertical edge wrap-around.
The cells are not grouped because of diagonal adjacency.
Group 2: A Normal 2×2 Quad
The second group contains:
m5, m7, m13, m15
Across these cells:
- B = 1
- D = 1
A changes.
C changes.
That gives:
BD
Combining the groups:
F = B'D' + BD
Why the Four Corners Are Adjacent
The four-corner group often looks unusual because the cells are visually separated.
The logic comes from edge wrapping.
The leftmost and rightmost columns are adjacent.
The top and bottom rows are also adjacent.
The four corners sit where both wrap-around relationships meet.
They do not form a group because diagonals are neighbors.
Diagonal cells remain non-adjacent.
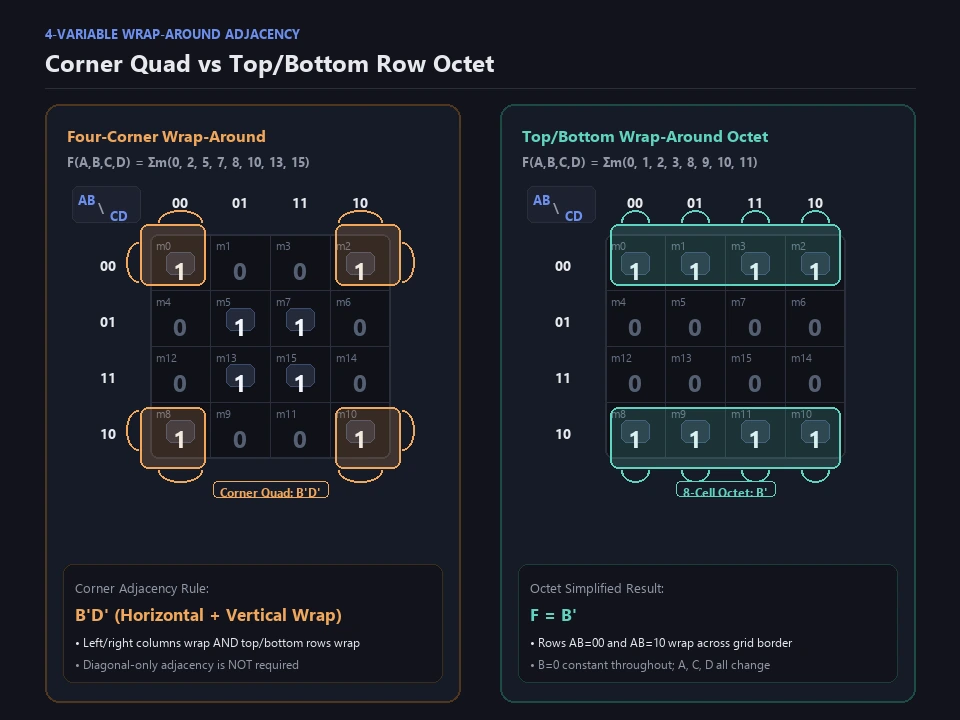
Wrap-around can connect opposite columns, opposite rows, or both at once; diagonal adjacency is never required.
Worked Example 2: An 8-Cell Wrap-Around Group
Consider:
F(A,B,C,D) = Σm(0,1,2,3,8,9,10,11)
These eight minterms fill:
AB = 00
and:
AB = 10
Those are the top and bottom rows of the Gray-code map.
Although they appear separated on the flat grid, the top and bottom edges are logically adjacent.
The two rows therefore form one valid octet.
Across the entire eight-cell group:
- B = 0
while:
- A changes
- C changes
- D changes
The changing variables disappear.
The result is:
F = B'
What About Overlapping Groups?
Overlap is valid in a 4-variable K-Map.
A required cell can belong to more than one group when that helps cover the function using better valid groups.
Do not avoid overlap simply because a cell was already used once.
At the same time, overlap should serve a purpose rather than being added unnecessarily.
Using Don’t-Care Values in a 4-Variable K-Map
Don't-care X values follow the same rules as in smaller maps.
For SOP, an X may be used like a 1 when it helps form a useful larger group.
For POS, it may be used like a 0.
If it provides no benefit, ignore it.
A well-placed X might turn:
- a pair into a quad
- or a quad into an octet
For more detail, see the guide to don't-care conditions in Karnaugh Maps.
SOP and POS with Four Variables
The basic distinction stays the same.
- SOP: group the required 1 cells.
- POS: group the required 0 cells.
The same 4×4 layout, Gray-code ordering, wrap-around rules, and power-of-two group sizes apply to both.
For a deeper comparison, see SOP vs POS in Karnaugh Maps.
Common 4-Variable K-Map Mistakes
- Using ordinary binary axis order 00, 01, 10, 11 instead of Gray code.
- Placing minterms in numeric order across each row.
- Treating diagonal cells as adjacent.
- Forgetting that opposite edges wrap.
- Missing the four-corner quad.
- Creating groups of 3 or 6.
- Using several small groups when a larger useful valid group could reduce terms or literals.
- Refusing to overlap groups when overlap improves the cover.
- Forcing don't-care cells into groups.
- Mixing SOP and POS grouping rules.
A Quick 4-Variable K-Map Checklist
- Start with a 4×4 grid.
- Label both axes 00, 01, 11, 10.
- Place minterms in their Gray-code positions.
- Fill every cell with 0, 1, or X.
- Decide whether the result is SOP or POS.
- Look for useful octets and large quads.
- Check opposite edges and all four corners.
- Allow overlap when it improves the cover.
- Derive terms from variables that stay constant.
- Verify the simplified result against the original function.
How to Verify a 4-Variable Result
A correct simplified expression must reproduce the original required output for all 16 input combinations.
Manual checking is possible because there are only 16 combinations, although it can become tedious.
You can also compare your manual grouping with the Karnaugh Map Solver and compare your manual result with the solver's minimized result. For higher-variable functions, explore how two linked 4×4 maps combine in our guide on the 5-variable Karnaugh Map.
Frequently Asked Questions
How many cells are in a 4-variable K-Map?
A 4-variable K-Map contains 16 cells arranged as a 4×4 grid.
What is the Gray-code order for a 4-variable K-Map?
The usual row and column order is 00, 01, 11, 10 so adjacent labels differ in only one bit.
How are minterms arranged in a 4-variable K-Map?
Their positions come from the binary ABCD values mapped onto Gray-code row and column axes. For example, m3 = 0011 sits in row AB=00 and column CD=11.
Can the four corners form one group?
Yes. They form a valid quad through simultaneous horizontal and vertical edge wrap-around, not through diagonal adjacency.
Can 4-variable K-Map groups overlap?
Yes. A required cell may belong to multiple valid groups when overlap helps create a simpler cover.
How do don't-care values work in a 4-variable K-Map?
An X may be used like 1 for SOP or like 0 for POS when it improves a valid group. Otherwise, it can be ignored.

